

You might have noticed that the standard topographic hiking map or app you use at home doesn’t show a lot of detail for Japan. Where are all the mountains and trails?
A big reason comes down to contour interval levels – the vertical distance between elevation lines. Typical global map layers often use wide 20-meter to 50-meter contour intervals (such as google maps), which smooth out or miss fine terrain detail and manmade features.
In contrast, Japan’s native maps from the GSI (Geospatial Information Authority of Japan) feature tight 10-meter contour intervals on their official 1:25,000 scale topomaps. This extra detail reveals subtle ridge lines, steep drop-offs, and micro-terrain that global apps completely miss.
Below, I share some of the best free topographic map and app options for Japan – including tools that tap directly into GSI data – along with four key steps to take before heading out on any Japanese trail.
Step 1. Always download or print a topographic map before you hike
If you’re looking for free, online printable topographic maps “地形図“ Japan GSI have an online map that you can print from.
In recent years they have added an English version of the map, however I highly recommend you view this map in Japanese as it appears the English language version has much less detail and missing trails.
Follow the steps below to print to A3 or A4. Otherwise this Yamareco tool makes printing the maps a little easier. And remember – make sure your map is in a waterproof map-case or laminated!
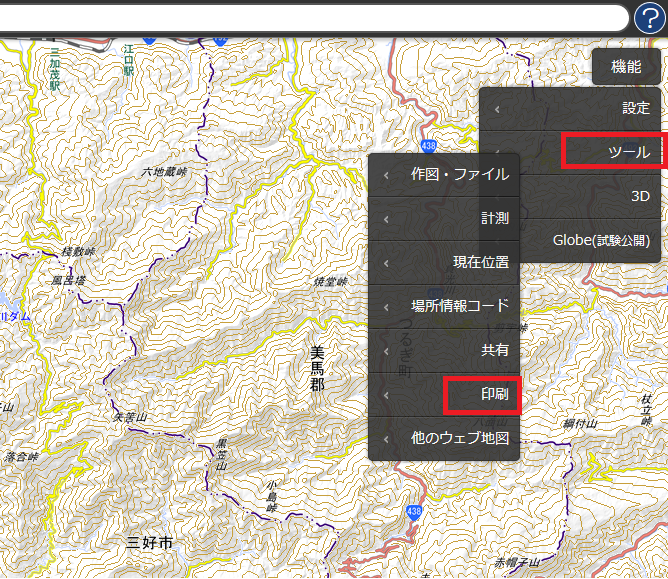
Click ”シール” then ”印刷” to print off a map in A4 or A3 size for free. You can also purchase them if you’ll use it regularly.
Step 2. Make sure you understand how to read a topographic map
There are many sites on the internet where you can learn how to read and use a topographic map and compass like this one.
People who hike without knowledge of what a topographic map is and how to find your location may eventually find themselves in trouble. Remember – having a compass, and learning how to orient a map to north is one of the first skills you should practice.

Even though I have GPS available I always carry a compass and a paper copy of a topographic map with me! This is a good site with a lot of information about topographic maps and navigation in Japan.
Step 3. Learn some basic kanji for hiking and running in Japan
If you cannot read Japanese or Kanji you’re going to have a harder time when you hike in Japan. Learning some “hike” kanji is also a fun way to study and learn about different place names! To help, here are some of the most common kanji characters that you’ll see a lot on hikes are below:
- Mountain: 山 (yama / san)
- Crest / Peak: 峰 (mine) / 岳 (dake) — Commonly used in mountain names
- River: 川 (kawa / gawa)
- Trailhead: 登山口 (tozan-guchi) — Literally “mountain climbing entrance”
- Pass: 峠 (tōge) — Mountain pass
- Summit: 山頂 (sanchō) / 頂上 (chōjō)
- Hut: 山小屋 (yamagoya) — Mountain lodge/hut
- Elevation / Altitude: 標高 (hyōkō) [Height: 高さ (takasa)] — 標高 is written on signs; 高さ is spoken in conversation
- Danger: 危険 (kiken) / 危ない (abunai) — 危険 is formal/written; 危ない is informal/spoken
- Bear: 熊 (kuma) — Often seen as 熊出没 (kuma shutsubotsu, “Bear sightings / Bears present”)
- Trail Closed: 通行止 (tsūkōdome) — Closed to pedestrian/vehicle traffic
- Falling Rocks: 落石 (rakuseki)
- Forbidden / Keep Out: 立ち入り禁止 (tachiiri kinshi)
- Stream / Ravine: 沢 (sawa) / 谷 (tani)
- Waterfall: 滝 (taki)
- Pond / Marsh: 池 (ike) / 沼 (numa)
- Water Source: 水場 (mizuba) — Refill spot for fresh spring water
- Ascent / Uphill: 登り (nobori)
- Descent / Downhill: 下り (kudari)
- Junction / Fork: 分岐 (bunki)
- You Are Here: 現在地 (genzaichi) — Found on trail map boards
- Toilet: トイレ (toire) / 化粧室 (keshōshitsu)
- Course Time: 所要時間 (shoyō jikan) — Required time to complete a section
Here is a great site explaining some useful Kanji and map features.
Step 4. Use a navigation app as backup or to record progress
I use two different navigation apps when I am hiking in Japan and other places like Australia. First, I use the Android Wikiloc app to record my hikes as I go and then I upload the trails afterwards. This allows me to see how long the hike took me exactly, and record where I went. From the WikiLoc website you can download the .gpx files of over 5,000,000 hikes, walks and bike trails from around the world.
I also use the AllTrails app. While its more useful features are behind a trial/paywall I find it worth it if you’re hiking a lot!
Yamap, which has a comprehensive list of hikes and maps in Japanese now also has an app on Android and iPhone (in Japanese). If you’re willing to practice Kanji – I recommend taking this along side any English languag app – as the maps they use may reveal more details than what might be available on an English language map (they appear to use the Japan GSI basemap above).
Wait.. but do I really need a printed map? I’m not going to be “that foreigner in the news” I swear
Yes! While I see many people these days hiking with only a phone – and you might get away with it – it really is not smart to hike without a printed map or proper GPS anywhere – especially in the harsher seasons.
Phones can go flat (more so in cold weather) and if you’re not familiar with the area or trails you don’t want to get caught out. In fact, there was a significant story in Australia recently highlighting how even “simple” tourist trails things can go very wrong. Keep your phone for quick trail checks, taking photos or recording the hike – but don’t use it as your only source of information or you’re eventually gonna have a bad time.